• About us
  • Donate
  • Privacy Policy
  • Terms of use
  • FAQ
  • Contact
  • Web Links
  • Home
  • 3D Tutorials
    • Basic Tutorial
    • Miscellaneous
    • Interior
    • Medieval Age
    • Weapons
    • Photoshop
    • Material Library
  • CG News
  • Submit
  • Forum
  • facebook
  • teitter
  • googleplus
  • linkedin

F12 release The Grove Release 3,Release 3 gets back to the core. Introducing new natural effects for greatly improved – and totally new – tree characters. Tree branches have many senses and matching r...read more

AAA Studio has released FurryBall 1.3, the latest update to its GPU-based renderer, improving render speed by up to 30%, and introducing a new scheme where people actively posting renders get to use t...read more

Metasequoia 4.5 (Ver4.5.5a) for OS X. Veteran Japanese hobbyist 3D modelling software Metasequoia has just been released for Mac. Developer tetraface’s recent 4.5 update makes Metasequoia available on...read more

Terragen VR Challange, $10,000 in prizes including Terragen 4! Enter the Terragen VR Challenge for a chance to win one of 10 copies of Terragen 4 Pro, up to $500 cash, and much more. ...read more

Starting March 24, 2016, the latest Nik Collection will be freely available to download: Analog Efex Pro, Color Efex Pro, Silver Efex Pro, Viveza, HDR Efex Pro, Sharpener Pro and Dfine....read more

  1. 1
  2. 2
  3. 3
  4. 4
  5. 5
  • Home
  • 3D Tutorials
    • Basic Tutorial
    • Miscellaneous
    • Interior
    • Medieval Age
    • Weapons
    • Photoshop
    • Material Library
  • CG News
  • Submit
  • Forum
  • Home
  • Basic Tutorial
  • Modelling MockingJay pin and GDI logo using 3ds Max

Modelling MockingJay pin and GDI logo using 3ds Max

Created: 11 February 2013 Written by Administrator Hits: 17164
  • Print
  • Email

Modelling MockingJay pin and GDI logo using 3ds Max

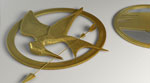
Some time ago we received a direct mail with a question about modelling a Mocking Jay pin and GDI logo using 3ds Max and because we try to fulfil the needs of our users we decided to create an tutorial about modelling both items. Looking at the reference pictures we got, we realized that the GDI logo is not such a problem as the Mocking Jay pin. The reason for that was the fact that comparing both items together the GDI logo is flat but the Mocking Jay pin has some shape because it shows a bird which of course is displayed more or less naturally also on the pin. After some searching for more reference pictures we started the modelling process. The first step as by other tutorials is setup the scene together with the reference pictures according which we will model. Because we are always modelling in real-world scale one important thing by this is the „unit setup“ inside 3ds Max which in our case is set to centimetres.

After placing the reference pictures we will start the process of modelling by deciding which method or approach to use by both items. In this case we will use for both items box-modelling technique which is very similar to poly-modelling technique but instead of using a single poly as a start element we will use a box. We will start the more difficult object at first, Mocking Jay pin, and position the box on our reference picture. Using editable-poly technique and functions we will extrude, move and position separate parts of our object to fit our reference picture and copy the shape we see. By moving separate parts we will achieve the shape of a bird and create also the rest parts of the pin. After finishing the first item we will proceed to the GDI logo. Because here the shape is flat but also very sharp we will very simple apply a similar technique as before also here and quickly create the logo and all of his parts. Later we will a bit change the final item to look a bit smoother.  We will use the 3D-Sphere material library which you can download from the menu on the left side of 3D-Sphere and apply materials to our model. For rendering i will use Photometric Lights and MentalRay for realistic looking result. At the end together with the final render we will render also an Ambient & Occlusion map and do some postproduction in Photoshop. You can watch the tutorial below and if you have any questions, just write us.

  • Include
  • Time
  • Software

  • Modelling using a reference
  • Modelling using poly-modelling technique
  • Using editable poly to add details
  • Smoothing the object using subdivision
  • Materials using Arch&Design
  • Lightning using MR Photometric Lights
  • Rendering, Ambient & Occlusion
  • Postproduction in Photoshop

  • 03:00:00

  • 3ds Max 2012
  • Photoshop (optional)


Attachments:
Access this URL (http://www.3d-sphere.com/3D.Tutorials/Basic_Tutorial/Badges/Max.Files/max.Files.zip)max.Files.zip[Max Files]497 kB
Access this URL (http://www.3d-sphere.com/3D.Tutorials/Basic_Tutorial/Badges/Textures/textures.zip)textures.zip[Reference & Textures]27039 kB

3D Tutorials

  • Basic Tutorial
  • Miscellaneous
  • Interior
  • Medieval Age
  • Weapons
  • Photoshop
  • Material Library

News

  • 3D Sphere
  • Software
  • Plugins
  • Renderers
  • 3D Portals
  • Academies & Design
  • Hardware

DonatePlease consider supporting our efforts.

:

Newsletter

Terms and Conditions

Latest News

  • 3D-Sphere Material Library for 3DsMax
  • offline-message
  • Cebas released thinkingParticles 6.3 (Subscription Drop 3)
  • How to create a miniature effect in Photoshop
  • The Blender Foundation released Blender 2.77

Popular

  • offline-message
  • Modeling a Laser Rifle in 3DsMax
  • Explaining reflections and using array function in 3ds Max
  • Modeling iPhone4 in 3DsMax
  • Modeling Interior Furniture in 3DsMax
CSS Valid | XHTML Valid | Top | + | - | reset | RTL | LTR
Copyright © Eximium 2022 All rights reserved. Custom Design by Youjoomla.com
Home