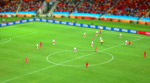
An old but still great effect which makes rea-life objects on a photo look miniature. We will basically apply a tilt-shift effect to a photo and try to make it look like a picture made by toys while applying and creating a miniature effect. Instead of creating a video tutorial I decided to create an HTML or pure TEXT only tutorial, so let’s see how it will end. Some theory about this technique is bellow but for us is important how to achieve this effect using Photoshop, I believe in any version. First step is also the most important; choose an appropriated photo for this manipulation. The effect can’t be applied to any photo and thus you have to search for a reference picture which was taken from a distance with wide view. What will be on the picture is up to you and because applying the effect is quite quick, you can experiment with various photos. For this example I choose the most simply photo I could, a photo taken from a football match, how nice! The beauty by this is that it already looks like a cartoon :).
Tilt–shift photography is the use of camera movements on small- and medium-format cameras, and sometimes specifically refers to the use of tilt for selective focus, often for simulating a miniature scene. Sometimes the term is used when the large depth of field is simulated with digital post-processing; the name may derive from a perspective control lens (or tilt–shift lens) normally required when the effect is produced optically.
- Using masking techniques to cut off images
- Merging images together
- Creating a tilt-shift effect
- Using different tools for adjustment
- Blending image together
- 00:20:00
- Photoshop (optional CS5)
Step 1: Open the picture and prepare the layers
Not much to explain here but anyway, open the file through the „File“ menu on the top or just by dragging the picture inside the editing area of Photoshop. After you will load the picture you will notice that the background layer, which should be now your pictures, is locked in the Layers panel. A small lock icon next to the layer. First off all we need to unlock this layer to have the opportunity to work with it. Simply, drag the small lock inside the trash and you are done – rename the layer. Copy the main layer by dragging it to the „Create a new layer“ icon in the Layers panel – rename the layer again.


Right now we have two identical layers next to each other, one with which we can work and the second just like a back-up copy. Right now we can turn off the initial background layer by clicking the „eye“ icon next to the layer. After following these simple steps you are ready to continue with applying the tilt-shift effect. Just look on the pictures bellow.
Step 2: Apply lens-blur
To achieve the miniature effect we will apply blur to the picture to achieve a look like the picture was taken with a certain focus to a certain point of the miniature, in our case, football field. And hence we don’t want to apply the blur effect to the whole picture but just for a certain portion. Hence, we will apply also a mask to the layer. If you want you can convert the layer to a smart object by simply clicking on the layer with the right mouse button and choosing „Convert to Smart Object“ or go to „Filters“ in the top menu and choose the same. The beauty of a smart object is that you can preserve the editing options of almost any filter you are applying, very handy in certain cases. The problem here is that you can’t apply „lens blur“ filter to an smart object but you can apply just the „Gaussian blur“ filter. The result is similar but I will go with the „lens blur“ filter. Select your working layer and go to „Filters – Blur“ and choose the „lens blur“ filter. A new dialog window will open with bunch of settings; play with it a bit for the best result. Apply a decent amount of the blur and if you are happy with the result we can continue.


At this moment the blur is applied to the whole picture but we want just a portion of it. For this we will simply add a „mask“ layer to the current layer by clicking on the „add layer mask“ icon located on the bottom of the Layers panel. Now what? :). Lest change the appearance of the mask by filling it with a gradient. Click on the „Gradient Tool“ or just press (G) and choose as the type „Reflected gradient“. Be sure that you have selected the mast next to the current layer and drag vertically a gradient as on the picture. If you will hit down and hold the „shift“ key you will draw always a straight line. Oh wait, what is happening?, remember the back-up copy? Of course, because we have only two layers and one is invisible, by creating the mask we will lose portion of the image which looks now transparent. Copy the „background“ layer between the „working“ layer and the original „background“ layer as we did above. Make it visible, better now :). Right now you can experiment with the final look of the blur, position and size. For example, I applied a 2px of „Gaussian blur“ on the „working“ layer to achieve a nicer look. The „Gaussian blur“ filter is accessible as the filter before in the „Filter“ menu.. After you will be happy with the result you can go straight to the next step.
Step 3: Adjust colors and brightness
The last step is more or less about fine-tuning of the colors of the picture and achieving a toy like look. First of all let’s merge the layers into a new one. To do this hit „ctrl+a“ to select everything, hit the combination of „ctrl+shit+c“ and afterwards „ctrl+v“. This will make a copy of all visible layers into a new one. Let’s rename it to something nice. To this layer we will apply „adjustment layers“. Select the new layer and using the „adjustment layer“ icon in the Layers window apply „Curves“ and „Hue/Saturation“ adjustment layers. Right click on the new layers and select „create clipping mask“. Using this function the new adjustment layers will affect only the current layer and not to every layer beneath them. Let’s do the changes by adjusting the properties of the new layers. With the „Curves“ layer we will adjust the brightness and using the „Hue/Saturation“ layer adjust the colors.


You can experiment with various settings and blur position to achieve the look you want. Check the gallery bellow, I did few more pictures with this effect. Happy editing folks!


