E-on Software Announces Availability of LumenRT 4.1 Studio

E-on Software released a new version of LumenRT 4.1 Studio adding extended capabilities for large MicroStation models and Revit export. The new version adds several important improvements including; New animated water materials – ocean, sea, lake, pond; Export of point lights from Revit and more. Read more ...

Southpaw Technology releases Tactic 4.0

Southpaw Technology has updated Tactic, its recently open-sourced asset and project-management system. Version 4.0 of the software focuses on ease of pipeline integration, improving database connectivity, adding a new plugin architecture, and adding HTML5 theming to enable studios to skin Tactic to match in-house tools. Find out more..

CG Artist Reference: Drawing From Reference Improves Skill and Productivity

Drawing from reference of some type is highly encouraged when in art school, and really by all established artists.  Reference can be photographic or live, and when used properly it becomes a tool that enhances productivity and the skill of an artist. Find out more..

MODO 701 Service pack is out

Not long after releasing MODO 701 comes first service pack. It fixes many bugs, so really necessary to download it. Find out more..

FurryBall3 – price for EDU version is reduced

Edu licence has no limits, EDU user just agrees with non-commercial use ONLY. Iit is valid one YEAR and include ALL free updares, upgrades and LOWER PRIORITY support. One student can purchase only ONE licence. Multilicence is available only for School institutions. Price is 99€. Find out more..

  • 0
  • 1
  • 2
  • 3
  • 4

Weapons

Print

Modelling a two stage Missile using 3ds max-Part 3

Written by Administrator.

Created on Thursday, 11 October 2012 14:54

Modelling a two stage Missile using 3ds max-Part 3

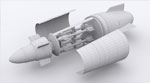
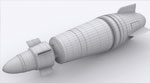
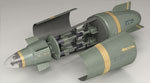
In this end part of the „two stage Missile“ tutorial we will prepare our model for texturing and also create the textures using Photoshop. In the parts before „part1“ and „part2“ we were focusing on the model itself, we were able to model all the details and major parts of the missile and as well the electronics and release mechanism for the secondary missiles. Here we will start by adjusting the UVW coordinates to our model. At first we will focus on the main missile, by this we will apply and create a UVW map which at the end we will render and move to Photoshop. This „mask“ will be used to properly adjust the texture which we will be creating and also help us as a guide to place all the textures into the right place. After adjusting the UVWs and the materials IDs we will straight jump to Photoshop and start creating our textures. The first one will be the main missile were we use and combine different textures from real world planes and aircrafts and with some blending options and adjustment place these parts on the mask which we did before and so create a nice looking texture which can be easily applied to our model. Using the same methods we will also create the rest of the textures and also we will use already made parts from the textures before and so create a new texture very fast and without the end to create the repeating layers and fragments one more time.

Print

Modelling a two stage Missile using 3ds max-Part 2

Written by Administrator.

Created on Friday, 28 September 2012 07:40

Modelling a two stage Missile using 3ds max-Part 2

The second part of the „two stage Missile“ tutorial would be again only about modelling and finishing the whole model using 3ds max. While in the first part we focused on the main missile, in this part we mainly do the second stage missiles and also the release mechanism for them. At first we start a bit to review our model which we done in the first part and straight after start the work on the second stage. We start with creating the carrying bay for the second missiles and create the room where our missiles would be locked. By this we will use our main missile model and using editable poly and poly-modelling technique we create the carrying bay. Right after this we start to work on our second missile. The design and shape of the second missile will be easier than the main missile but still it will carry an interesting shape with fly wings. After creating the second missile we will start to work on locking and releasing mechanism for the second missiles. This part is very important because the details we do there.

Print

Modelling a two stage Missile using 3ds max-Part 1

Written by Administrator.

Created on Thursday, 13 September 2012 18:18

Modelling a two stage Missile using 3ds max-Part 1

After modelling the Iron Man helmet I decided to do something I wanted for a long time, a two stage missile. The idea is coming from an article I read a long time ago and since then I wanted to create something similar but of course using my concept. The basic idea for the concept and shape of the missile is based on the Hellfire missile and it’s used as the initial shape. The shape was redesigned by us and a basic sketch was created according which we will model and built the missile. The tutorial is because his length divided into „three main stages“; 1) Modelling the main missile, 2) Modelling the secondary missile and the details, 3) Creating textures and rendering. Because we will be modelling according a reference the first step will be placing the reference picture inside the scene and prepare our environment for modelling.

Print

Modelling Iron Man helmet using 3ds max

Written by Administrator.

Created on Thursday, 23 August 2012 07:21

Modelling Iron Man helmet using 3ds max

In this tutorial i will show you how to model Iron Man helmet, texture it and render using Autodesk 3ds max and Adobe Photoshop. By this we will use poly modelling technique where we start from a single poly. This technique is widely used for car or head modelling and the steps and technique covered in this tutorial is the same and you can use them to model anything. We will start preparing our scene for modelling and place the reference pictures inside 3ds max environment. Because we are modelling from a single poly we need at least three pictures; front, side and back to be able to model the helmet according the reference picture. After the initial set-up we will start the modelling process starting with the front cover of the helmet and continue with the rest of the helmet. The modelling process is very simple and only the basic editable-poly tools are used to build the model.

Print

Modelling an Star Trek Phaser using 3ds Max

Written by Administrator.

Created on Friday, 29 June 2012 05:27

Modelling an Star Trek Phaser using 3ds Max

After publishing the Star Wars Lightsaber tutorial i decided to do also something from the Star Trek universe. By choosing what to do i came across the Phaser which was the basic weapon in all series and movies and so became a part of Star Trek. Moreover comparing these two weapons together we have on one side a Lightsaber with a simple shape but all small details on it and on the other side the Phaser with very less details but more complicated shape. This major difference between these two weapons make them actually ideal for tutorials where in one you can learn to add the details and in the second build complicated smooth shapes.