 Sait Bakırcı shared with us the construction stages of his work on a project called ElectroBot. If you would like to contact Sait Bakırcı, use the contact information on the bottom of this article. I have been working on for a while and have finally completed it. The Transformers movie was my childhood hero. I would watch it with great joy and passion. Sometimes I would even imagine that my toy cars would eventually change into robots. Other times, I would take apart my toys (the motor, wires, tires, etc.) and use these parts as arms and legs and connect them with rubber bands to make my own robots.
When the series’ first came out in 2007, myself and many others were captivated by the fact that the movie was supported with today's visual effects. I was inspired by the movie and told myself that no matter what I need to have my own robot, I need to design a robot and I eventually started my project.
When I was child, taking apart my cars and making a robot was easy; however, now, the situation was a little different and I didn't know where to start. Later down the line, I conducted a detailed search on the internet. I found many trailers, pictures, and documents and went through all of them. Then I started to slowly create the design I had in mind. After a 2.5 month period, I had planned and completed my project. I used some of the visual pictures as a reference (Picture 1 and Picture 2) throughout this project. I didn't find these visuals to use them identically but rather I choose to use them as my muse.


Introduction to Modelling
Before I started my model, as a result of my research, I realized that the model had to be designed in such a way that every part had to be integrated with each other and that they had to be suitable for animation. For this reason, I constructed the anatomy of my model with this in mind. For example, if you want to model a gun, all of the parts need to be connected from the same original point. If not, then it would be no different than a crooked bicycle tire that is out of sync with the other. This would only make us loose time during the animation phase. Because of this, I divided my model into sections. I developed separate construction phases and plans for the Head, Body, and Arms and Legs. I want to start by explaining the Head's modelling phase.
Stage 1. Modelling the Head
After completing my research, I needed to start working. The modelling technique I generally used was based on polygon modelling. First I roughly modelled the base and then moved on to the next step which was detailing. (Picture 3)
I realized that once you have designed and obtained the base, this makes things much easier. If you start your work from the details, this will make your life much more difficult. I continued my work by modelling the eyes. (Picture 4). By further developing the model, I continued to give details to the base and put emphasis on the eyes and nose. (Picture 5).


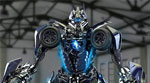
After completing the rough base, I started detailing. I want to note that I didn't use a reference when I modelled the tiny parts on the head. I completely improvised during modelling. I wanted my model to have a warrior identity so I started to model the curves and details accordingly. (Picture 6 ). At this stage, I had almost completed the head model. After adding the accessories that I designed, I finished my head model. (Picture 7 and Picture 8).