 Recently I was confronted with one question from our users regarding a picture made from small boxes which were forming a larger box together with reflective material to this surface. The overall modelling by this case isn’t any problem and the inbuilt array function will create this kind of object without problems but the reflections on this flat surface is a different story. But let’s take it step by step. The inbuilt array functions inside 3ds Max is used for creating one-, two-, and three-dimensional arrays. For example, a row of five objects is a single-dimension array, even though it takes up three-dimensional space in the scene. An array of objects that's five rows by three columns is a two-dimensional array, and an array of objects that's five rows by three columns by two levels is a three-dimensional array. As you can see, using this function you can create very simple but also very complex objects where repeating of the same objects is required.
3D Tutorials

Browsing the net I found out that many users are interested in modelling so called egg chairs which are representing the modern art and are a nice piece of furniture. Because we need quite a lot of materials and models inside our interior which will be the output of our interior section I decided to model this kind of item. Looking on other similar tutorials about this chair I decided to choose another approach and model the chair as “right” as possible. We will start with setting-up our scene and creating our starting primitive. Because the chair has a spherical shape we will start with creating a simple sphere which we will use as our starting object. The right primitive will be in our case an advantage in two steps. At first, the shape is already something which we would like to have and for second, we can use the outline edges of the sphere for creating the opening inside our chair. In our case the starting element will be a sphere and the modelling technique, poly-modelling technique. We will use the sphere and the modelling technique for creating both the stand for the chair which would be going directly from the sphere and also the opening in which we would create a soft pattern on the background. To fill in the free space which we created by creating the opening in the sphere we will create pillows.
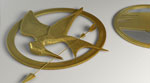
Some time ago we received a direct mail with a question about modelling a Mocking Jay pin and GDI logo using 3ds Max and because we try to fulfil the needs of our users we decided to create an tutorial about modelling both items. Looking at the reference pictures we got, we realized that the GDI logo is not such a problem as the Mocking Jay pin. The reason for that was the fact that comparing both items together the GDI logo is flat but the Mocking Jay pin has some shape because it shows a bird which of course is displayed more or less naturally also on the pin. After some searching for more reference pictures we started the modelling process. The first step as by other tutorials is setup the scene together with the reference pictures according which we will model. Because we are always modelling in real-world scale one important thing by this is the „unit setup“ inside 3ds Max which in our case is set to centimetres.

In the tutorials before I already showed that the options of Photoshop are almost unlimited and that these options are only bounded by your imagination. To proceed with this I decided to create a tutorial where we will create a floating castle by manipulating and merging multiple images together. Although we already were merging different images together this one is a bit different. The difference consist in the art how we will proceed. The first step is of course the idea of the final image and this step is also very important. The initial condition which we will set for the final image will also guide our workflow. Our idea is to create a floating castle in a mountain environment and for this we also need the corresponding images to do so. If we choose the images which we could use to create our final image, the Photoshop work will begin. At first we will cut off the castle from the background using some masking technique.

Slowly but for sure the 14th November is coming and with this day also the St. Valentine’s Day. To this occasion I decided to create a romantic card using Photoshop. The initial idea was taken from s stock photo I saw inside a photo library but was not for free, so i decided to create something similar with images you can find on the web. The initial idea was to create the card with a romantic topic, in my case two swans in the shape of a heart are the carriers of this idea. After finding all images we start to edit and merge different parts of the card together. As first we will cut off and mask the swans and place them on another surface. This process will also include some fixes, creating new shadows and also creating new adjustment layers to create the final look of the swans. After this part will be finished we will place some flowers on one side of the card to raise the romantic feeling of the card even more and blend everything together.