 3ds Max alone is powerful enough to fulfil most users’ demands on this software but there is still a lot space for improvements and add-ons which can improve not only the functionality of 3ds Max but also speed up your workflow. We could divide these add-ons into two parts; plug-ins and scripts. Plug-ins are generally intended to bring new functionality to 3ds Max or any other software and so enhance the functionally of the software itself. Thanks to 3ds Max SDK the developers are free to do literally anything and bring new features such as; new modelling tools, new renderers, and new primitives and so on. Most of the plug-ins are not free of charge but still there is plenty of them for free and some are more than useful. The scripts on the other hand are using a programing language called MAXScript which is available directly through 3ds Max interface.
3D Tutorials
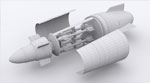
The second part of the „two stage Missile“ tutorial would be again only about modelling and finishing the whole model using 3ds max. While in the first part we focused on the main missile, in this part we mainly do the second stage missiles and also the release mechanism for them. At first we start a bit to review our model which we done in the first part and straight after start the work on the second stage. We start with creating the carrying bay for the second missiles and create the room where our missiles would be locked. By this we will use our main missile model and using editable poly and poly-modelling technique we create the carrying bay. Right after this we start to work on our second missile. The design and shape of the second missile will be easier than the main missile but still it will carry an interesting shape with fly wings. After creating the second missile we will start to work on locking and releasing mechanism for the second missiles. This part is very important because the details we do there.
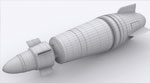
After modelling the Iron Man helmet I decided to do something I wanted for a long time, a two stage missile. The idea is coming from an article I read a long time ago and since then I wanted to create something similar but of course using my concept. The basic idea for the concept and shape of the missile is based on the Hellfire missile and it’s used as the initial shape. The shape was redesigned by us and a basic sketch was created according which we will model and built the missile. The tutorial is because his length divided into „three main stages“; 1) Modelling the main missile, 2) Modelling the secondary missile and the details, 3) Creating textures and rendering. Because we will be modelling according a reference the first step will be placing the reference picture inside the scene and prepare our environment for modelling.
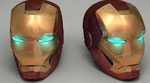
In this tutorial i will show you how to model Iron Man helmet, texture it and render using Autodesk 3ds max and Adobe Photoshop. By this we will use poly modelling technique where we start from a single poly. This technique is widely used for car or head modelling and the steps and technique covered in this tutorial is the same and you can use them to model anything. We will start preparing our scene for modelling and place the reference pictures inside 3ds max environment. Because we are modelling from a single poly we need at least three pictures; front, side and back to be able to model the helmet according the reference picture. After the initial set-up we will start the modelling process starting with the front cover of the helmet and continue with the rest of the helmet. The modelling process is very simple and only the basic editable-poly tools are used to build the model.

In the first part of this tutorial „Modelling Nokia 5630 using 3ds max–Part 1“ we did the cover of the mobile keeping the major details such as the buttons for this part. We will start with changing the top shape of the model where we will perform some cuts and so tune the battery cover on the back to be the same as on the reference picture. Together with this we will also fix the geometry to fix the poly flow of the model. Straight after this we will continue with the front part of the phone where are placed all the buttons together with the displays. By this we will use the shape merge function to „cut“ new edges and polys inside our shape and so be able to quickly model all the buttons which the phone have. After all details are finished i will explain you how i did the textures and bump maps inside Photoshop and begin with assigning the materials id’s to the model. The textures by this are just bump maps creating a bump effect on the buttons and covers.